
- Camshafts
- Carburetor
- Clutch
- Cooling Hoses
- Cylinder/Piston
- Engine/Gearbox Oil Lines
- Exhaust
- Head

- Camchain Issues
The KLX650 engine is largely "bullet-proof" due to the robust design of the bottom-end, primary drive, clutch and gearbox, and the modest "race-state" of the camshaft. Unfortunately, Kawasaki opted for a double camchain arrangement, ostensibly to reduce the diameter of the camshaft sprockets and produce a smaller, neater top-end. Although many would argue this concept is needlessly complex, it functions quite well.
Camchain/Timing failure, which does happen on occasion, is not due to the complex design as such, but to the automatic camchain tensioner. The upper camchain tensioner is a spring-loaded, ratchet design, similar to that found in many other motorcycle engines, and identical (or almost so) to that found in many Kawasaki engines. It produces pressure on the rear upper camchain guide arm, to maintain camchain tautness. Occasionally, the ratchet teeth become slightly worn, and backing the engine off suddenly from high revs can result in the upper camchain becoming loose enough to alter the camshaft timing, usually with catastophic results (valves engaging directly with the piston etc.).
It should be stressed that this is not a common fault (or there wouldn't be so many motorcycle manufacturers continuing the design), but fortunately there are many excellent manual camchain tensioners available commercially, so it is strongly suggested that one of
these is fitted while the engine is still going OK.


- Carburetor Issues

All models of the KLX650 employ a Keihin CVK40 carburetor, with only the main jet size being the critical difference between the various models (there are also very minor differences between the size of the pilot jet, the unremovable starter jet and the type of jet needle used). These are a Constant Velocity type carburetor designed to primarily facilitate a smooth delivery of power from the engine. They are not a performance type carburetor but do still provide adequate engine power and responsiveness.
Apart from the wear of or failure of a carburetor part, almost all carburetor problems stem from blockages within one or more of the jets, or blockages within the channels inside the main block of the carburetor itself. The blockages are usually the result of either impurities in the fuel itself (from corroding steel fuel tanks, poor handling of fuel, or the build-up of old fuel deposits), or most commonly, solidified fuel residue from long periods of not running the engine. The solution is to thoroughly clean the carburetor. There are two methods that are commonly used to do this: 1/ utilising organic cleaning solvents, such as acetone, paint thinners etc. (these type of chemicals are found in off-the-shelf carburetor cleaners). 2/ using weak solutions of either alkaline or acid cleaning chemicals in conjunction with an ultrasonic cleaning machine.

NOTE - only the metal parts are to be subjected to these cleaning regimes.
The first method is good for an initial clean as it will remove gums, oils and varnishes on the carburetor body, however it rarely manages to successfully penetrate the small orifices within the carburetor body where old fuel residues may be lodged, and often only partially clears blocked jets.
The second method will usually result in a fully cleaned carburetor, provided the carburetor has been fully stripped down prior to the ultrasonic treatment and providing the most appropriate cleaning solution(s) are used.
Most commonly sold ultrasonic cleaning solutions are of the alkaline type and can be quite effective at removing stubborn internal blockages, however they can often leave a dark colouration on the alloy carburetor material if used at too high a concentration or if the parts are left soaking for too long. A more successful treatment is to use mild acids such as citric acid and to thoroughly rinse off the acid solution after each batch of ultrasonic immersions. Citric Acid is the active ingredient in many common surface spray cleaners sold by supermarkets. The ideal solution concentration is between 0.5% and 1.0% Citric Acid, so use pure de-mineralised water to dilute to this concentration.
After properly stripping down the carb, the following parts should be available for ultrasonic cleaning. 1/ The main body; 2/ The float bowl; 3/ The Air Cut Valve cover (14025A); 4/ 3 brackets (11048A, 35011, 11048), but only if they really need cleaning as they are anodised steel and shouldn't be immersed for long periods; 5/ Jets and screws (parts 92063, 13091, 16017, 92064, 16014, 92009A). Take care to only immerse the Air Cut Valve cover for the minimum time period as the alloy is slightly different to the main body and float bowl, and is potentially more porous.
Ultrasonic devices can be purchased quite readily online and come in various sizes. The ideal size will be one that can accommodate the entire carburetor body (after disassembly) and all of the smaller pieces, ensuring all of the pieces are fully immersed in the ultrasonic tank. A stainless steel basket is normally used to hold the heavier parts and the entire tank solution is heated prior to the ultrasonic treatment, to anything up to 80°c. Most ultrasonic devices have a timer to ensure the process only lasts for around 20 - 30 minutes. Several "runs" can be done and the cleaning efficiency assessed after each run. The various parts can also be rotated or inverted in between runs. When the cleaning is deemed adequate, the carburetor pieces must be thoroughly soaked in clean, de-mineralised water to ensure there is no acid residue left on the metals.
Once all the pieces have been allowed to dry they can be sprayed with some WD40 (or the like) and re-assembly can take place. This ensures no additional corrosion takes place prior to the carburetor being actually used.
If necessary, or if a really high quality job is desired, a carburetor repair kit can be purchased and many or all of the new parts incorporated in the re-assembly. This is highly beneficial for parts such as the rubber diaphrams, float and needle, and some of the smaller jets/screws.
Sometimes there is actual damage to the carburetor itself, making cleaning a moot point. New genuine Keihin CVK40's are expensive, but fortunately their Chinese copies are quite cheap, and just as effective.
- Exhaust Header Retaining Studs

The exhaust header pipe is secured to the head via two large "nuts" that tighten onto two studs that are embedded into the head. The studs are designed to stay in the head at all times in order that the aluminium threads within the head do not degrade.
After several years of use, sometimes the large nut(s) can become seized onto the outer stud(s) thread. When the nut(s) are removed, the seized nut(s) can often bring the entire stud(s) out as well. This is not a good situation, as continued use of the seized nut/stud combination will result in the thread in the cylinder head becoming worn (aluminium being much softer than hi-tensile steel).
The remedy is to un-seize the nut/stud, clean up the threads, and screw the stud only back into the head. Firstly, screw two hi-tensile nuts (M6 X 1.25), onto the free end of the seized stud so that the lower nut is flush with the end of the stud. Balance the siezed stud vertically onto the lower nut. Now carefully spray WD40 (or similar) into the hexagonal opening at the top of the large nut, until it is full. Do this several times over the course of a few days, until the thread has been thoroughly soaked. Now, lock the two hi-tensile nuts together using one ring spanner and one open-ended spanner. Place the lower nut into a vice, so that the rest of the stud is pointing vertically upwards (it would be ideal if you could hold the upper of the two hi-tensile nuts, but the dimensions of the large nut above make this impossible). Using an allen key, gently undo the large upper nut that is seized. By gently, I mean force it but don't break either the stud or the allen key. Usually it will unseize without too much trouble, if it has been soaked for long enough.
Now, after removing the two hi-tensile nuts, clean up the stud threads with an appropriately sized die, and clean up the large nuts with an appropriately sized tap. Next, lock the two hi-tensile nuts onto the outer stud thread (the outer thread end is slightly tapered on the tip, the inner thread end is flat) and use the outer nut to screw the stud back into the head. You can use Loctite if you are paranoid, or just some WD40 if you are not. Make sure the stud is fully home (see photograph) and that it is tight. DO NOT over-tighten or you will strip the thread inside the head.
When screwing the two large nuts back into place, as you fit the exhaust header, use some high temperature grease on the threads.


- Valve Clearance Issues
Over a period of time, wear takes place on the overhead valve components, inevitably leading to a change in the valve clearances. Wear on the cam lobes and shims is usually minimum, but some wear will usually take place on either end of the valves (top end of valve stem and valve to seat face) and the valve seats. This is caused by the constant percussive nature of the valvetrain, combined with the rotation of the valves (the latter occurs in a most uneven and unpredictable fashion).
Wear on the top end of the valve stem leads to an increase in valve clearance, while wear on the valve to seat face and the seat face itself, leads to a decrease in valve clearance. This is why it is essential to regularly check the valve clearances.
Valve clearances that are greater than recommended will result in a noisy (tapping) engine, and will lead to greater than normal additional wear on the upper end of the valves. Valve clearances that are less than recommended will eventually lead to loss of compression when the engine reaches operating temperature. This is due to the valve(s) being held slightly open on the compression stroke. Unfortunately this loss of compression can easily be incorrectly diagnosed as bore/piston/piston ring issues, so rectifying incorrect valve clearances can often solve what at first may appear to be a major engine problem.
The KLX650 uses a 29mm diameter shim inserted into a recess in the valve spring cap. Shims are available in 0.05mm increments, from 2.00mm to 3.20mm. They are usually available through Kawasaki dealers, but can also be purchased either individually or in sets, from maufacturers such as Vintco.
The correct valve clearances are:-
Inlet: 0.10 - 0.19mm
Exhaust: 0.15 - 0.24mm
Consult the service manual for the correct procedure to release the camchain and remove the camshafts, prior to replacing the shims. See the engine top end parts breakdown on the Diagrams page.
- Cylinder/Piston Issues
 There are two quite different cylinder bore designs employed by the KLX650. The C models (C1-C4 Electric start) use a conventional steel barrel sleeve, which allows for reboring to several oversizes. This older, conventional design gives a heavy barrel weight and larger piston to cylinder tolerances (0.063-0.090mm). The larger tolerances are due to the different expansion properties of the steel liner and the aluminium piston, when heated under operating conditions.
The KLX650R models (A1-A3, B1-B3, D1-D6) employ a fully aluminium barrel with no inserted sleeve. The inside of the carefully machined bore is coated with a super-hard surface by a process known as electrofusion. Electrofusion is applied using extremely high voltage electrical currents passed through, firstly a 1mm molybdenum wire, then a 2mm carbon steel wire, which are held centrally within the bore. This results in fine layers of these metals being exploded onto the bore surface. The process is repeated many times until an extremely hard, durable and yet slightly surface porous coating is achieved.
The result is a design that gives very light weight, high durability, good lubricating properties and small cylinder to piston tolerances (0.018-0.045mm) due to the similar expansion rates of the cylinder and the piston.
Unfortunately, if any damage does occur (even minor) to the cylinder wall surface (of a KLX650R), the barrel needs to be resurfaced with a process either the same as electrofusion, or similar. In practicality, the usual procedure is to have the cylinder wall resurfaced with a process known as Nikasil. Nikasil is actually a proprietry trade name for a process which electroplates a lipophilic nickel matrix silicon carbide coating on the cylinder wall. It is not the same as electrofusion, but is considered superior and is far more readily available. The original electrofusion surface is removed and the new Nikasil surface is applied. Then, special honing tools adjust the surface and bore diameter to match the new piston and rings.
The original electrofusion surface can suffer deterioration in many ways, not just mechanical (like piston seizure). It can also be eaten away by fuel (or other liquids) entering the cylinder and remaining there, with the piston not moving, for several months or years. Once the barrel has been thoroughly cleaned, if there are any marks on the inside surface they must be carefully examined. If you can feel any depression into the barrel surface, with your fingernail, the bore will need resurfacing with a Nikasil type process. The same applies if the cylinder bore has become worn beyond factory tolerances (see Service Manual).
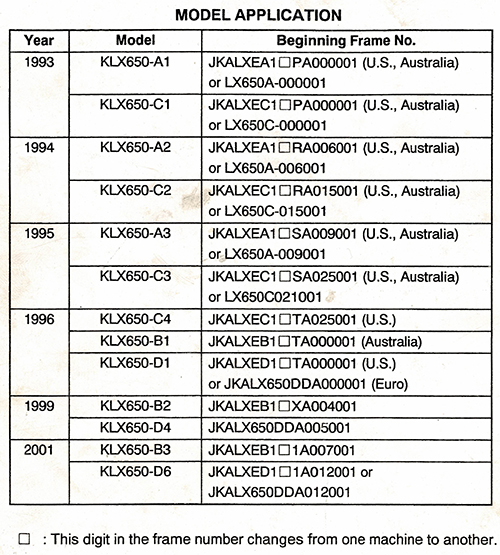
- Understanding The VIN (Vehicle Identification Number)
The VIN is found in two places: - firstly stamped on the frame, usually on the headstem;
secondly stamped on the Compliance Plate (if the bike has one), which is also mounted on the headstem.
- Example VIN:
JKALXEB141A007077
First 3 characters = WMI (World Manufacturer Identifier), in this case JKA = Japan, Kawasaki
4th and 5th characters = model series, in this case LX = KLX series
6th character = model size, in this case E = 650
7th and 8th characters = model designation, in this case B1 = B1 series
9th character = check digit (set arbitrarily by manufacturer)
10th character = year of manufacture, in this case 1 = 2001
Final 7 characters = actual frame number
- Year Characters
1993 = P 1994 = R 1995 = S 1996 = T 1997 = V 1998 = W
1999 = X 2000 = Y
2001 = 1 2002 = 2 2003 = 3
- Paint Codes
The following is a list of known (official) paint codes for the various colour schemes between 1993 and 2003. The paint code(s) are not located on the compliance plate, like most cars, but are supposedly on a sticker somewhere attached to the frame. Usually the sticker is also not present, so paint code(s) need to be sought via a Kawasaki dealer, or direct from Kawasaki themselves in the corresponding country where the bike was sold.
Some automotive paint suppliers have a Spectrophotometer available to accurately measure the exact colour of a sample. This is ideal for things like plastic fenders etc. but impractical for things like a motorcycle frame.
Color Rite paint suppliers have a useful search function for various automotive paints, on their website, however they only list a few years of the KLX650.

1993 - 1996
KLX650C1-C4 (Electric Start)
Colour Scheme 1: Purple Frame - Green Tank/Guards/Fenders
- Frame Colour Code: Kawasaki Frame Violet 692 (some claim that it is Kawasaki Jet Ski Violet 694, but this is less likely)
- Tank/Guards/Fenders Colour Code: Kawasaki Lime Green 617 (this Lime Green was active on Kawasaki bikes up until 2004)
- Seat Colour Code: Kawasaki Frame Violet 692

Colour Scheme 2: Purple Frame - Red Tank/Guards/Fenders/Side Covers
- Frame Colour Code: Kawasaki Frame Violet 692
- Tank/Guards/Fenders/Side Covers Colour Code: Kawasaki Sunbeam Red 639
- Seat Colour Code: Kawasaki Frame Violet 692

Colour Scheme 3: Teal Green Frame - Black Tank/Guards/Fenders/Side Covers
- Frame Colour Code: Possibly Kawasaki Pearl Teal Green 675 (SM 2191)
- Tank/Guards/Fenders/Side Covers Colour Code: Kawasaki Ebony Black 602
- Seat Colour Code: Possibly Kawasaki Pearl Teal Green 675 (SM 2191)

1993 - 1995
KLX650A1-A3 (KLX650R)
Colour Scheme 1: Purple Frame - Green Tank/Guards/Fenders
- Frame Colour Code: Kawasaki Frame Violet 692
- Tank/Guards/Fenders Colour Code: Kawasaki Lime Green 617
- Seat Colour Code: Kawasaki Frame Violet 692

1996 - 1998
KLX650B1 (KLX650R Australia)
KLX650D1-D3 (KLX650R Europe/USA)
Colour Scheme 1: Purple Frame - Green Tank/Guards/Fenders
- Frame Colour Code: Kawasaki Frame Violet 692
- Tank/Guards/Fenders Colour Code: Kawasaki Lime Green 617
- Seat Colour Code: Kawasaki Frame Violet 692

1999 - 2000
KLX650B2 (KLX650R Australia)
KLX650D4-D5 (KLX650R Europe/USA)
Colour Scheme 1: Black Frame - Green Tank/Guards/Fenders
- Frame Colour Code: Unknown (at present, but enquiries are being made)
- Tank/Guards/Fenders Colour Code: Kawasaki Lime Green 617
- Seat Colour Code: Unknown "Grey" (at present, but enquiries are being made)

2001 - 2003
KLX650B3 (KLX650R Australia)
KLX650D6 (KLX650R Europe/USA)
Colour Scheme 1: Green Frame - Green Tank/Guards/Fenders
- Frame Colour Code: Kawasaki Lime Green 617
- Tank/Guards/Fenders Colour Code: Kawasaki Lime Green 617
- Seat Colour Code: Unknown "Grey" (at present, but enquiries are being made)
* Note 01: Kawasaki Lime Green 617 was superceded in 2005 by Kawasaki Lime Green 777.
Most after-market plastics available to fit KLX650's are in the latter colour (777), which is a deeper lime green.
* Note 02: Kawasaki Lime Green 617 is also known as 7F-2011
* Note 03: A number of photographs have appeared on the internet, over the years, showing KLX650's with a silver/grey frame colour. Most have been 1993-1995 C models, however there have also been a few 1996-1998 D models and even 1999-2000 D models. The silver/grey colour is similar to that used on the C model swingarm; on the rear suspension linkages of all models; and on the sidestand of all models, with variations in depth of colour. It is unknown if this is a genuine factory colour scheme.
The following Kawasaki KLX650 parts are often sought after, but no longer available from Kawasaki or from any "new, old stock" suppliers. All parts are listed with their genuine Kawasaki Part Number first, followed by their genuine Kawasaki Part Description.
These rare parts must be obtained on the secondhand market, if they are required. If you have these parts, in good condition on your KLX650, we suggest that you take good care of them.
Click on a part number to see a diagram of where the part is situated. Click on a part description to see an image of the part.
These are the sought after camshaft, cam chain guide, and cam chain tensioner parts. They are common to all KLX650 engines.
12044-1346 Camshaft-Valve,Exhaust (A, B and D models)
12044-1347 Camshaft-Valve,Exhaust (C models)
12048-1139 Tensioner-Assembly (Commonly replaced with aftermarket manual tensioner)
12053-1306 Guide-Chain,Front,Lower
12053-1329 Guide-Chain
13235-1064 Guide-Comp,Front,Upper
13235-1065 Guide-Comp,RightRear,Upper (This is the guide that is commonly destroyed when the stock cam chain tensioner fails)
13235-1066 Guide-Comp,RightRear,Lower
92144-1744 Spring,Decompressor
These are the sought after cylinder barrel and piston parts.
11005-1719 Cylinder-Engine (This is the steel-molybdenum electrofusion barrel used on the A models)
11005-1824 Cylinder-Engine (This is the steel-molybdenum electrofusion barrel used on the B and D models)
13001-1438 Piston-Engine (Corresponding standard size piston used on A, B and D models) (After market piston kits are available)
98111-1059 Cylinder-Comp-Engine (This is the complete cylinder barrel used on the C models)
11007-1127 Liner-Cylinder (This is the steel cylinder liner used on the C models)
13001-1401 Piston-Engine (This is the standard size C model piston. Still available but extremely limited quantities) (After market piston kits are available)
13027-1174 Piston-Engine LL,O/S (This is the first oversize C model piston)
13029-1220 Piston-Engine L,O/S O (This is the second oversize C model piston)
These are the sought after air cleaner parts.
11011-1421 Case-Air Filter (This is the external air filter housing for the A, B and D models)
11012-1856 Cap, Air Filter (This is the corresponding lid. Virtually unavailable now)
11011-1429 Case-Air Filter (This is the external air filter housing and battery holder for the C models)
11011-1430 Air Filter Case (This is an alternative C model part)
11012-1829 Cap, Air Filter (This is the corresponding lid)
These are the sought after exhaust parts.
18090-1296 Body-Comp-Muffler (This is the standard muffler for the A, B and D models. Virtually unavailable now) (After market mufflers are available)
18090-1300 Muffler Body, Complete (This is the standard muffler for the C models) (After market mufflers are available)
18090-1305 Body-Comp-Muffler (This is an alternative C model part) (After market mufflers are available)
Page Unfinished.......